Build your first SwiftUI app (Part 1): Project setup

The goal of this series of articles is to provide you with a simple, easy-to-follow procedure that you can use every time you want to create a new SwiftUI app. You could see it as a “blueprint” for all of your future iOS projects written in SwiftUI.
Even if you are a complete beginner in SwiftUI development, you should be able to follow this guide, as we will cover each area step by step. Together we will lay the groundwork for all the basic building blocks of an iOS app, so you can use and adapt that blueprint app to your specific project requirements.
Learning outcomes
Throughout this series, you will learn how to:
- Initialize and set up your project in XCode,
- Enable CocoaPods, SwiftLint, and localization,
- Set up project architecture and folder/file structure,
- Implement basic screens, navigation, and reusable UI views,
- Create a mechanism for handling API requests,
- Create a mock server for testing API integration,
- Handle authorization and secrets,
- Enable continuous integration and continuous delivery (CI/CD),
- Upload and publish your app on the App Store.
Since there is a great deal of material to cover and to avoid making each article too lengthy and cumbersome, we will focus on practical application rather than theory. This means that you will be able to easily follow each step of the app creation process, but we will not go deeply into the theoretical reasons why it was done in that particular way.
With that said, let’s roll up our sleeves and start building our SwiftUI app!
Create a new XCode project
Let’s start our journey by creating a fresh XCode project. We will be creating an iOS app, so let’s choose that template.

You can enter anything you want in your Product Name and Organization Identifier, but make sure that you set SwiftUI as your interface. We don’t need to enable the Use Core Data or Include Tests checkboxes at this point, but feel free to do so in your next projects.

Great! Now we have a fresh iOS project. Our first task is to do some basic project configuration. Let’s open our main project target and look at the General tab.

Here you can set many parameters, such as the app display name, whether your app will support iPad devices, and which orientations are available. However, one of the most important decisions you have to make when starting any mobile project is the minimum OS version. Since we are using SwiftUI, which is only supported on iOS 13 and above, it doesn’t make sense to set a minimum OS version to anything lower than 13.0.
However, I would actually advise bumping this number to 14.0, the biggest reason being that SwiftUI on iOS 13 is really, really bad. It has a lot of bugs and isn't worth the trouble because you have to fix many of them by hand, which can make your whole codebase a big mess.
A fair justification for setting the minimum OS version to 14.0 (or an excuse, depending on how you look at it 😀) is that, at the point of writing this article, according to Apple’s iOS usage tracker, 99% of all iPhone and iPad devices introduced in the last four years use iOS 14 or higher. Taking this into consideration, it is reasonable to set this constraint, which will make your life a lot easier later.
Install CocoaPods
CocoaPods is not the only dependency manager for iOS, but it is among the most convenient ones. So let’s set it up in our project. Open your terminal and run the following command:
$ sudo gem install cocoapodsNext, go to your project root folder (the one that has the .xcodeproj project file), and run:
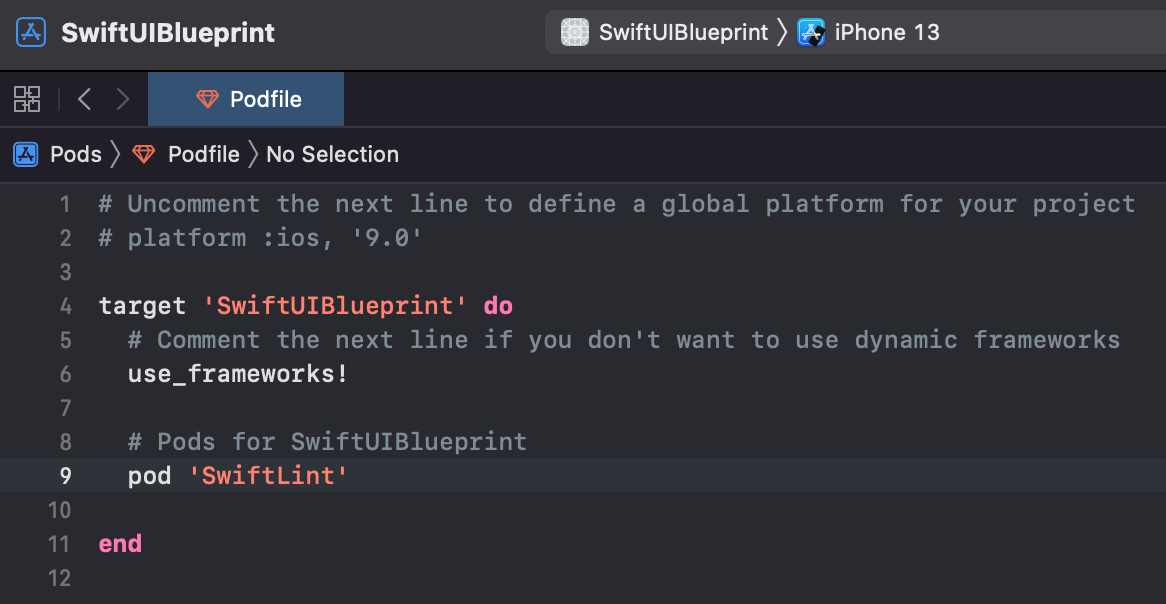
$ pod initThis will create a Podfile that will hold all your external Pod libraries. Each time we make a change in this file, we need to run:
$ pod installLet’s run this command now. Our Podfile is empty, so no new libraries will be installed. However, we will see one very important message:

What just happened is that running the pod install command generated a workspace that now contains both our XCode project (that holds our app code) and the Pods project (that holds our CocoaPods libraries).
In practice, this means that from now on, you will never work with your .xcodeproj file directly, but you will be using .xcworkspace file instead. So now is the time to close your XCode project and open your workspace (in my case, it is called SwiftUIBlueprint.xcworkspace).
SwiftLint
We’ve just enabled CocoaPods support in our project, but we are not using any libraries yet. Let’s change that by installing our first pod. And what better one to start with than SwiftLint! The purpose of this tool is to enforce Swift's style and conventions, ensuring that you (and everyone else working on the project) are writing clean code.
We’ll install this library by adding it to our Podfile so it looks like this:

After running pod install again in the console, we can see that the latest version of SwiftLint (in my case, version 0.47.0) is now installed:

However, as you can see from SwiftLint’s readme, this is not enough to make it display warnings and errors in the XCode issue navigator.
In order to do this, we need to add SwiftLint as a build phase. Let’s go to our project file again and choose the Build Phases tab. Click on the plus button and select New Script Run Phase.

Let’s name our phase SwiftLint and put the following script in it:
"${PODS_ROOT}/SwiftLint/swiftlint"When this is done, your build script should look like this:

Now would be a good time to test if SwiftLint works. Let’s open our Content View and do something that will trigger a warning (for example, adding too many empty lines) and build.

If you can see the Vertical Whitespace Violation warning in your editor, then it works! 🎉 This powerful tool will help you keep your code clean and consistent.
If, for some reason, you want to ignore a specific SwiftLint warning, there is a way to do that. Create a file called .swiftlint.yml in your project root. You can put this file in any project folder, though, but in that case, you would need to update your build script with some extra data for everything to keep working.
Let’s say we want to ignore the vertical_whitespace rule. In that case, the content of our .swiftlint.yml file would be:

If we build now, we will see that our previous warning is now gone:

The .swiftlint.yml configuration file can help you disable any SwiftLint rule that you find annoying or don’t want to enforce in your app. It can be especially useful if you want to stop code checks from happening in external libraries. However, I do recommend not ignoring SwiftLint rules unless it is absolutely necessary!
Localization
Another essential part of any mobile project is the localization of all your messages. Setting up localization early on is very important. You should do it as soon as you create the project, so you don’t have to refactor a large portion of your codebase later on if you start supporting multiple languages in your app. However, even if you don’t plan to support multiple languages, it is still good to localize your strings, so you have them all in one convenient place.
Let’s start by opening the Project Info screen.

As we can see in the Localizations section, our fresh project has two languages: Base and English — Development Language. The Base language is automatically created for you as the app’s default language, which will most likely be English if you are making your app for the global market.
However, we can see on the right side that there are “0 Files Localized”. Let’s change that by creating our Localizable.strings file.
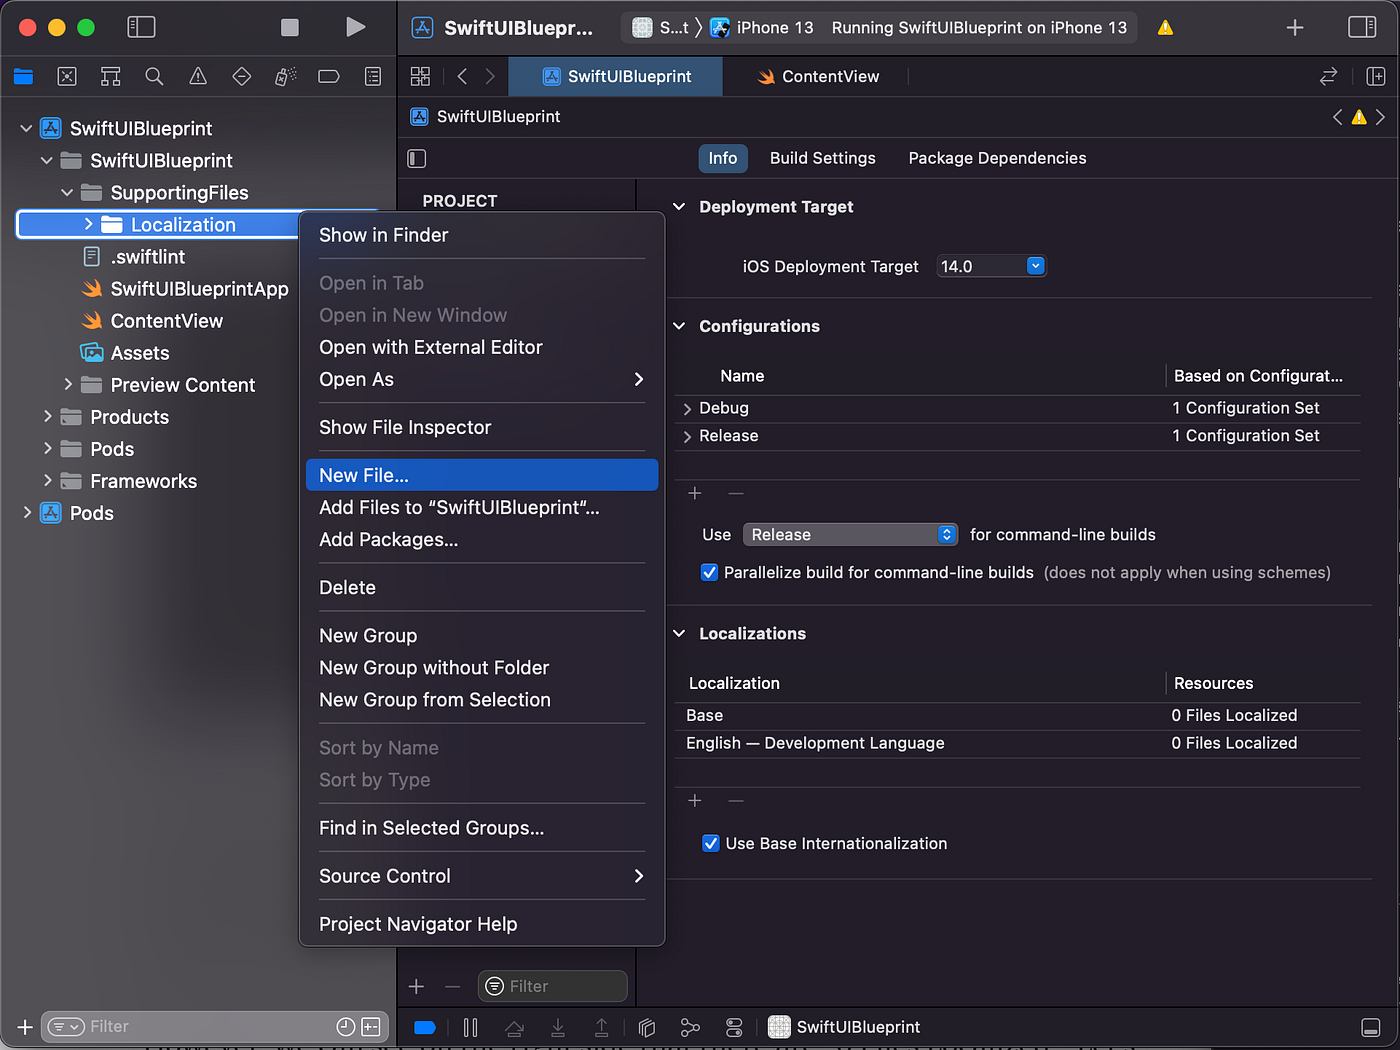
First, let’s organize our project by creating a new folder called SupportingFiles. This folder will hold our localization and other supporting files. In this folder, create a new folder named Localization, and finally, choose to add a new file to that folder.

In the New File window, search for the Strings File template under the Resource category and choose it.

Let’s name our file Localizable.strings and click Create.

We now have our first Localizable.strings file where we can enter our strings. However, it is still not localized. As a final step, click the Localize… button on the right side of the editor.

Great! Now our Project Info screen will show 1 File Localized for our English — Development language. Let’s add another language so we can test if everything works properly. Click on the little + button at the bottom of the Localization section and choose another language, for example, German.

XCode will recognize the Localizable.strings file you already created, so just click Finish to use it as a reference for the German language.

Done! Now we have two Localizable files, one for each of our supported languages.

However, these files are completely empty at the moment. Let’s enter a sample string in both language files and see if everything works properly.
It is good practice to name your localizable string keysViewName.ComponentName.Purpose, so some common localizable keys could be:
LandingView.Title
LandingView.Subtitle
LandingView.LoginButton.Title
LandingView.AreYouSureAlert.Title
LandingView.AreYouSureAlert.Description
Since we only have one view in our app at the moment, and it’s called ContentView, let’s add these strings to our localization files:
"ContentView.WelcomeMessage" = “Hello, World!";
in Localizable (English),"ContentView.WelcomeMessage" = “Hallo, Welt!";
in Localizable (German).

Finally, let’s jump to our ContentView and change the Text component so it uses our localized string instead of the current hardcoded one by replacing Text("Hello, world!") with Text(NSLocalizedString("ContentView.WelcomeMessage", comment: "")).
Now is the time to run our app for the first time in the simulator!

Nice! It seems everything is working as expected. But will the app show German language when needed? Let’s test it out by opening Settings in the iOS simulator and navigating to General -> Language & Region -> iPhone Language, and then choosing German. After that, let’s run the app again.

Great! Now we have localization set up in the project, which will make string management much simpler as the project grows in size. There is one more thing we could do, though. You might have noticed that we are using our localization strings by typing:
NSLocalizedString("ContentView.WelcomeMessage", comment: "")This is a pretty cumbersome chunk of code for such a simple task, don’t you agree? Let’s make the localization functionality easier by creating a String extension in our project.
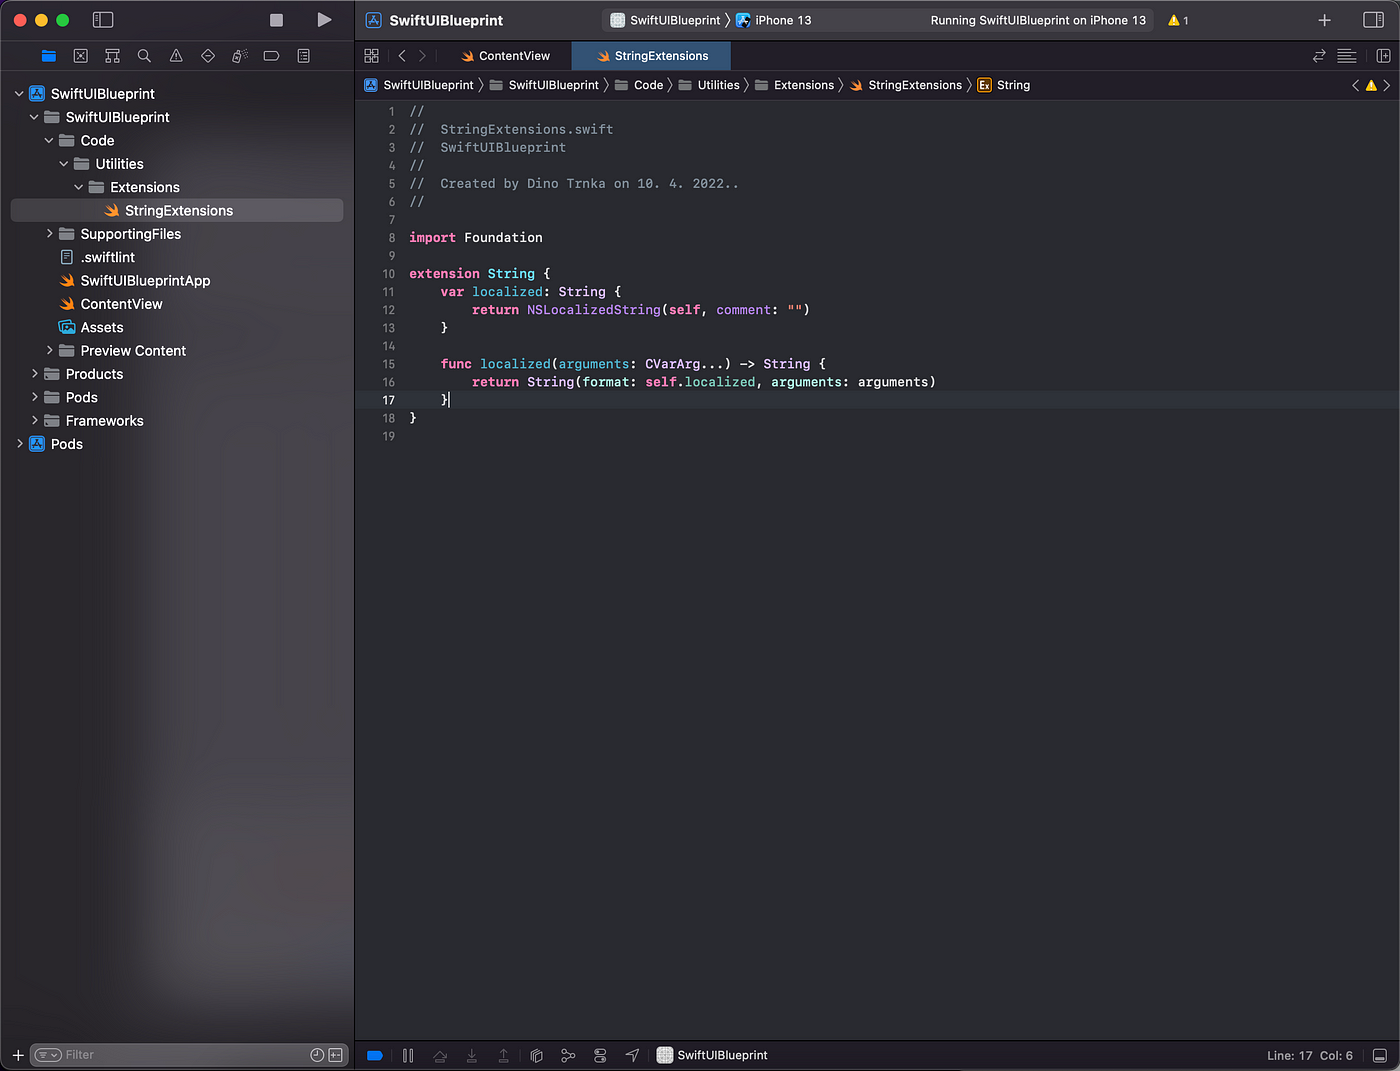
The first thing we will do is create some folders. Create a folder called Code in the root folder because this is where we will put all of our application code. Next, create a new folder inside Code called Utilities. Finally, here you need to create another folder called Extensions, and inside this folder, add a new Swift file called StringExtensions.swift. with the following content:
import Foundation

extension String {
    var localized: String {
        return NSLocalizedString(self, comment: "")
    }
    func localized(arguments: CVarArg...) -> String {
        return String(format: self.localized, arguments: arguments)
    }
}
This string extension we just made provides us with two benefits:
- Now we can localize much easier by typing
"StringKey".localizedinstead ofNSLocalizedString("StringKey", comment": "")each time. - The function we wrote allows us to inject arbitrary arguments in our localized strings through code, such as names, numbers, and so on.
Let’s try this out by changing our current "Hello, World!" message to say "Good morning, Peter!", where Peter is a parameter we will pass from our ContentView.
We need to change three parts of our code:
"ContentView.WelcomeMessage" = “Good morning, %@!";
in Localizable (English),"ContentView.WelcomeMessage" = “Guten Morgen, %@!";
in Localizable (German),Text("ContentView.WelcomeMessage".localized(arguments: "Peter"))
in ContentView.swift.
Here’s what these three files should look like after this change:

Now let’s boot up the app and check it out!

And there you have it! We have implemented a very handy way to localize our strings, which will help us organize all of the messages that can show up in our app.
Congratulations!
We are done! 🤩
For now, that is. In the grand scheme of things, we’ve only just begun since there are many more challenges to tackle as we build our first SwiftUI app.
But we’ve already completed some of the most important steps in any iOS app. You should be proud of yourself because you have now created and set up the base project in XCode, enabled CocoaPods support, installed SwiftLint to make sure your code is good, and enabled localization.
Congratulations! 🥳🎉
Demo project ❤️️
If you want to download a project that contains everything we’ve done so far, you can do it by clicking here.
Next part ⏭️
In the next article, we will learn how to set up the architecture for our project. Stay tuned for more!


